This Is Not the Method You Are Looking For
Setting up CGI service under IIS is surprisingly complicated compared to running Fossil as a CGI under most other operating systems. We recommend that you use the simpler reverse proxying method instead unless there is some compelling reason why that method cannot work for you, such as its dependence on non-stock IIS extensions. (Keep in mind that both extensions it requires are by Microsoft, not third parties!)
Once you’ve got this scheme working, it gives the same benefits as those listed at the top of the linked-to document.
There is a small benefit you get from using CGI over reverse proxying on other OSes, which is that the Fossil program only runs briefly in order to serve each HTTP hit. Once the request is done, that Fossil instance shuts back down, releasing all of its resources. You don’t need to keep a background Fossil HTTP server running full-time to provide CGI-based Fossil service.
You lose a lot of that benefit on Windows:
It only matters to start with on servers that are highly RAM constrained. (Roughly ≤ 128 MiB.) Our configuration steps below assume you’re using the Windows and IIS GUIs, which have RAM requirements well in excess of this, making Fossil’s resource requirements a drop in the bucket next to them. On the Azure B1s virtual machine I used to prepare these instructions, the Windows Server Manager GUI kept filling the VM’s 1 GiB of RAM during feature installation and crashing. I had to upgrade the VM’s RAM to 2 GiB just to get useful work done!
Process creation on Windows is much more expensive than on the other OSes Fossil runs on, so the benefits of firing up a Fossil executable to process each HTTP request are partially swamped by the overhead of doing so.
Therefore, unless you’re willing to replace all of the GUI configuration steps below with command line equivalents, or shut the GUI down entirely after configuring IIS, CGI is a much less compelling option on Windows.
WARNING: The following tutorial appears to fail with the current (2019-08-17) version of Fossil, apparently due to an inability of Fossil to detect that it’s being run in CGI mode.
Install IIS with CGI Support
The steps for this are identical to those for the reverse proxying IIS setup except that you need to enable CGI in the last step, since it isn’t installed by default. For Windows Server, the path is:
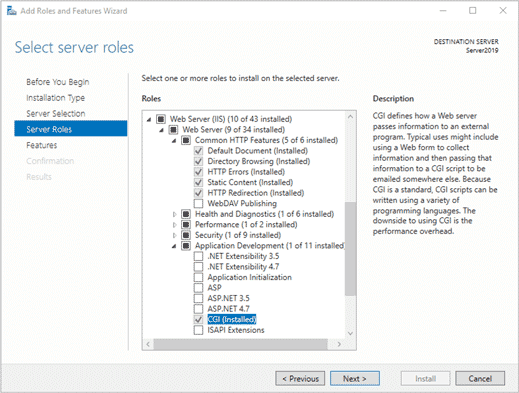
The path is similar on the consumer-focused versions of Windows, once you get to that last step.
Setup
Install the Fossil executable to
c:\inetpub\wwwroot\binon the web server. We can’t use an executable you might already have because IIS runs under a separate user account, so we need to give that executable special permissions, and that’s easiest to do under the IIS tree: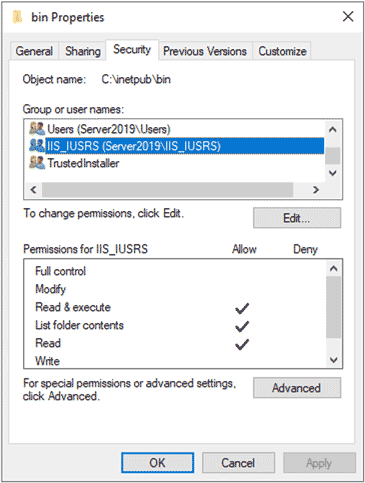
In IIS Manager (a.k.a.
INETMGR) drill down into the Sites folder in the left-side pane and right-click your web site’s configuration. (e.g. “Default Web Site”)On that menu say “Add Virtual Directory.” Give it the alias “
cgi” and point it at a suitable directory, such as “c:\inetpub\wwwroot\cgi”.Double-click the “Handler Mappings” icon, then in the right-side pane, click “Add Script Map...” Apply the following settings:
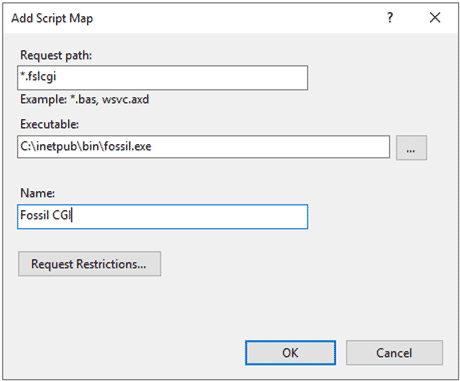
The Executable path must point to the path we set up in step 1, not to some other
fossil.exeyou may have elsewhere on your system. You will need to change the default “*.dll” filter in the Open dialog to “*.exe” in order to see it when browsing via the “...” button.Create a file called
repo.fslcgiwithin the CGI directory you chose in step 3, with a single line like this:repository: c:\Users\SOMEONE\museum\repo.fossilGive the actual path to the repository, of course.
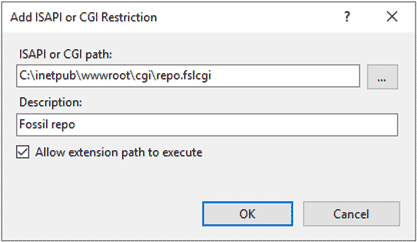
Up at the top level of IIS Manager, double-click the “ISAPI and CGI Restrictions” icon, then click “Add...” in the right-side pane. Give the script you just created permission to execute:
In the right-side pane, click “Restart” to apply this configuration, then test it by visiting the newly-available URL in a browser:
http://localhost/cgi/repo.fslcgi
For more complicated setups such as “directory” mode, see the generic CGI instructions.